
Amazon Redshift is a powerful cloud data warehouse that organizations can use to analyze structured and semi -off data through advanced SQL queries. As a fully managed service, it provides high performance and scalabibility while allowing secure access to the data stored in the data warehouse. Organizations around the world rely on Amazon Redshift to handle massive data sets, upgrade their analytical capacity and provide valuable business intelligence to their stakeholders.
AWS IAM Identity Center serves as a preferred platform to check the workforce access to AWS tools, including Amazon Q Developer. It allows you to connect to your existing identity provider (IDP), creating a unified view of users across AWS applications, and applying credible identity promotions for a smooth and composing experience.
You can access data in Amazon Redshift local users or external users. The local user in Amazon Redshift is a database user center that is created and managed directly in the RedShift cluster itself. Amazon Redshift also integrates with IAM Identity Center and promotes credible identity promotions, so you can use third-party IDS such as Microsoft EN-ID (Azure AD), OKTA, Ping, Oneelogin or use Iam Identity Center as a source of identity. The IAM Identity Center integration with Amazon Redshift supports centralized authentication and SSO ability and simplifies the management of access across more numbers. As the organization grows on a scale, it is recommended to use external users to integrate between services and centralized access.
In this post, we are going through the intelligent migration of local Redshift migration to the IAM identity Center users and groups using the usefulness of the redshiftidcmigration.
Solutions
The following diagram illustrates the architecture of the solution.
The RedshiftidCMIGRATION server speeds up the migration of local users, groups and roles of the Redshift to the IAM Identity Center by performing the following activities:
- Create users in Iam Identity Center for each local user in the instance of the redshift.
- Create groups in IAM Identity Center for each group or role in the instance of the redshift.
- Assign users to groups in Iam Identity Center according to existing tasks in the instance of Redshift.
- Create roles of IAM Identity Center in the instance of Redshift, which corresponds to groups created in IAM identity centers.
- Granting permission to the role of IAM identity centers in the instance of Redshift on the basis of current authorizations provided to local groups and roles.
Prerequisites
Fill in the following assumptions before starting the tool:
- Enable Iam Identity Center in your birth.
- Follow the steps in the Integrate Identity (IDP) with the Amazon Redshift Editor V2 and SQL Customers editor using AWS Im Identity Center for trouble -free login (specifically, follow steps 1-8, skipping steps 4 and 6).
- Configure the Iam Identity Center:
- On the IAM Identity Center consoles, choose Assigning an application and Application.
- Select your app and at Action Choosing a drop -down menu, choose Modify the details.
- For Assigning users and groupschoose Do not require assignment. This setting allows you to test Amazon Redshift without configuring specific permissions to access data.
- Configure the authentication of IAM Identity Center with an administrative approach from Amazon Elastic Compute Cloud (AMAZON EC2) or AWS Cloudshell.
The tool will be launched from the Eith Instance EC2 or Cloud. If you are using an EC2 instance, the instance is connected by the IAM role. Make sure the role of IAM used in implementation has the following permission (if not, create a new policy with these permissions and attach it to the role of IAM):
- Amazon Redshift Permissions (for Serverless):
- Amazon RedShift Permissions (to secure):
- Identity Identity Permissions:
Artifacts
Download the following artifacts of usefulness from GitHub Repr:
- Id – to interpret users, groups, roles and their associations on Python Script.
- Redshift_unload.ini – Configured file used in the previous script to read details about the RedShift data warehouse and Amazon S3 location to unload files.
- Id – Python Script for creating users and groups in Iam Identity Center and then assign users to groups in IAM identity centers.
- IDC_CONFIG.INI – The configured file used in the previous script to read the details of IAM Identity Center.
- vw_local_Ugr_to_idc_urgr_priv.sql – A script that generates SQL commands that perform two tasks in Amazon Redshift:
- Create roles that exactly match your Iam Identity Center and add a specific prefix.
- Admiata Grant permission to these newly created roles with red shift.
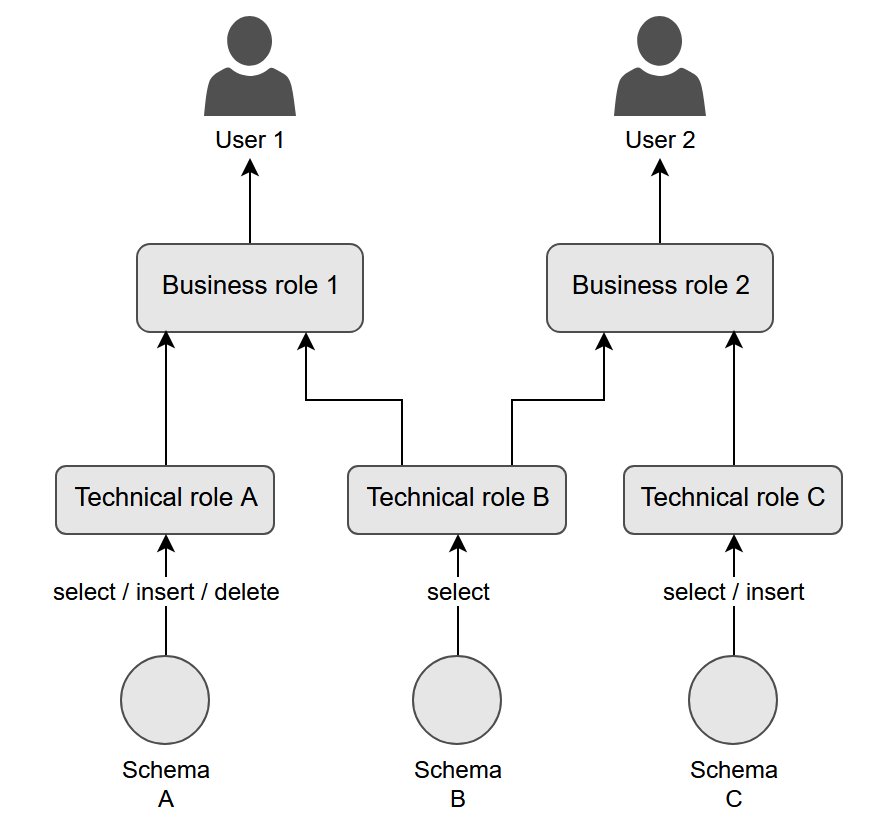
Test scenario
This test case is designed to offer practical experience and introduce you to the functionality of the tool. The scenario is structural around the hierarchical system of nested roles, ranging from the rights at the level of objects assigned to technical roles. These technical roles are then assigned to business roles. Finlly, business roles are grants to individual users. To increase the test environment, the scenario has also integrated into a group of use. The following diagram illustrates this hierarchy.
Create data sets
Set two separate schemes (tickit and tpcds) In the Redshift database using the Create Schema command. Then create and fill several tables in each scheme using TICKIT and TPCDS data sets.
If necessary, enter the relevant role of IAM role Amazon Resource name (RNA).
Create a user
Create users with the following code:
Create business roles
Create business users with the following code:
Create technical roles
Create technical roles with the following code:
Create groups
Create groups with the following code:
Grant rights to technical roles
You want to grant rights to technical roles, use the following code:
Make technical roles of business roles
You want to award technical roles business role, use the following code:
To grant business roles to users
You want to provide business roles to users, use the following code:
Grant rights to groups
You want to grant rights rights to groups, use the following code:
Add users to groups
You want to add users to groups, use the following code:
Set up a solution
Complete the following steps to deploy a solution:
- Update the Details of the End Point for RedShift or without Server and Rent Amazon S3
redshift_unload.ini::- Cluster_Type =
provisionedgoldserverless - cluster_id =
${cluster_identifier}(Required ifcluster_typeisprovisioned) - db_user =
${database_user} - db_name =
${database_name} - host =
${host_url}(Required ifcluster_typeisprovisioned) - port =
${port_number} - Workgroup_Name =
${workgroup_name}(Required ifcluster_typeisserverless) - region =
${region} - S3_BUCKET =
${S3_bucket_name} - role =
roles.csv - Users =
users.csv - Role_Memberships =
role_memberships.csv
- Cluster_Type =
- Update the details of Iam Identity Center in
idc_config.ini::- region =
${region} - Account_id =
${account_id} - Identity_store_id =
${identity_store_id}(Available on IAM Identity Center Settings page) - Instance_arn =
${iam_identity_center_instance_arn}(Available on IAM Identity Center Settings page) - permits_set_arn =
${permission_set_arn} - Assignment_permission_set =
TruegoldFalse(TrueIfpermission_set_arnis defined) - S3_BUCKET =
${S3_bucket_name} - users_file =
users.csv - Role_file =
roles.csv - ROLE_MEMBERSHIPS_FILE =
role_memberships.csv
- region =
- Create a directory in the cloudhell or on your own EC2 instance with an Amazon Redshift connection.
- Copy two .ini files and download Python scripts to this directory.
- Run
idc_redshift_unload_indatabase_groups_roles_users.pyEither from cloudhell or instance EC2:python idc_redshift_unload_indatabase_groups_roles_users.py - Run
idc_add_users_groups_roles_psets.pyEither from cloudhell or instance EC2:python idc_add_users_groups_roles_psets.py - Connect your Redshift cluster using the Amazon Redshift V2 queries editor or SQL preferred customer using Superuser login data.
- Copy SQL to
vw_local_ugr_to_idc_urgr_priv.sqlFile and run it in queries editor and createvw_local_ugr_to_idc_urgr_privview. - Run the following SQL command and generate SQL commands to create roles and permissions:
Consider, for example, the following existing grants:
These grants are converted to the following code:
- Check commands in
idc_based_grantscolumn.
This may not be a list of understanding permissions, so check them carefully. - If everything is correct, start the SQL client commands.
When you complete the process, you should have the following configuration:
- Iam Identity Center now includes newly created users from Amazon Redshift
- Local groups and Redshift roles are created as groups in Iam Identity Center
- New rolls are based on Amazon Redshift, which corresponds to groups created in IAM Identity Center
- The newly created red shift roles are assigned to a modification
If you encourage the problem when connecting to Amazon Redshift with Question Editor using IAM Identity Center, Redo -Return to eliminate problems with connection from Amazon Redshift V2 questions.
With regard to
Consider the following when using this solution:
- At the time of writing, creating permission in the Lake AWS formation is not in the range.
- IAM Identity Center and IDP Integration settings is out of range for this usefulness. However, you can use the view
vw_local_ugr_to_idc_urgr_priv.sqlYou want to create roles and grant authorities to users and groups IDP to go through the Iam Identity Center. - If you have permission provided directly to the local user ID (not using groups or roles), you must change them to permission based on IAM identity integration roles. Create roles and provide permissions using roles instead of direct provision permissions to users.
Clean up
If you have completed the test scenario, clean your environment:
- Remove the new red shift roles that have been created by usefulness, corresponding to groups introduced in IAM identity centers.
- Remove users and groups created by the tool within IAM Identity Center.
- Remove users, groups and roles listed in the testing scenario.
- Place
tickitandtpcdsSchemes.
You can use the power parameter to remove roles to remove the assignment.
Conclusion
In this post, we showed how to migrate your redshift local user management to IAM identity centers. This transition offers several key advantages for your organization, such as simplified access management through centralized user and groups management, efficient user experience across AWS services and reduced administrative direction. You can implement this process of migration step by step, so you can try and verify each step before the full transition of the production environment.
As the organization continues to expand their AWS infrastructure, the use of IAM identity centers is becoming more and more valuable for safe and efficient maintenance access, Amazon Sagemaker Unified Studio for integrated experience for all your data and AI.
About the authors